embedded programming
The week's assignment was to read a microcontroller datasheet (here for the ATtiny24A/44A/84A family) and to program our board from the electronics design week to do something, in as many different programming languages and environments as possible.
Reading through parts of the datasheet was helpful for me, because prior to that I didn't really get was going on in a microcontroller (and honestly I still don't super-duper do, but my understanding is a little bit better). Also, the datasheet has all the pins labelled with what they are and what they can do, which is necessary information for designing and programming the board.
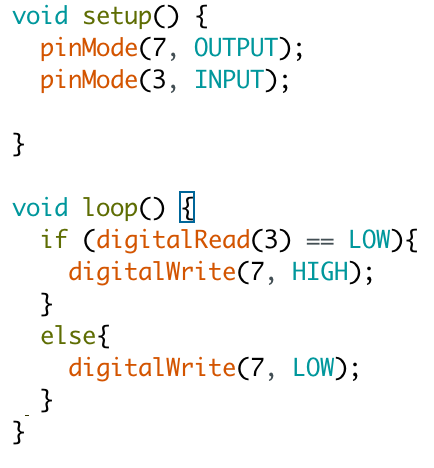
I started (and more or less ended) with the Arduino IDE following this guide . I started with just getting the light to turn on, then ran what was basically Arduino's blink program, and then I had the light turn on or off when the button was pressed, which is a fairly simple process. The pin for the button is initialized as an input. When the button is pressed, that pin goes to ground, aka LOW, and while it is unpressed the pin is floating at HIGH. So based on whether that pin is LOW or HIGH, the LED pin, which was initialized as an output, will go to either LOW (off), or HIGH (on).

The above picture is of the light having turned on, which is exceedingly exciting, I know. Also, yes the FabTinyISP is just plugged into my computer. The EECS section's usb-usb cables were not working so much anymore, so I just went for it, somewhat delicately.

And that's the wildly sophisticated code in the Arduino IDE.
From there, I tried to write and compile just C code using AVRdude and GCC. I'd installed Crosspack earlier, and could successfully run some of Neil's programs, so I'm assuming that that set up is alright, and I just have absolutely no idea how to write C code. :(
The point being that I wasn't successful in just writing C, but I'm working on it. Because I feel like I should know how to do that.
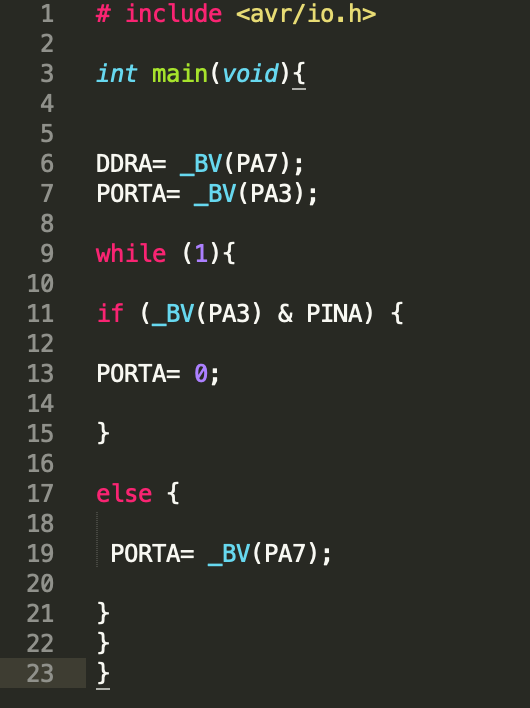
Yay. I've gotten the equivalent program working in C. woot.

This is what it looks like in C. The relevant parts are the var/io.h library and the DDRA and PORTA stuff. The DDRA= _BV(PA7) sets analog pin 7 as the output and the PORTA = _BV(PA3) enable the pullup resistor on analog pin 3, which is where the button is. For a while, I couldn't get this to work because my computer couldn't find io.h and it took me awhile to realize I installed the library in a dumb place.
you even get a video!